Wigging A Man – Part 3
“Wigging Roland”
Basic Instructions For Wigging A Mini Man Doll
 As you can see, Roland
looks great with
his hairstyle already,
and this style would
work for an older man.
To continue, add a
line of glue in a loose
“M” pattern from
temple to temple as shown.
 Lay another prepared
curly hank of hair
carefully across the
line of glue.
It is important that the
hair be as even in
thickness as
possible.
Leave it to dry!
(This is important!)
 When it is dry, carefully
flip the hair back.
This is where your
designing skill will come
in handy.
You will see that by
pulling more on the hair
the style will change.
I don’t like it too
“poofy”, but again it
depends on the era
 Cut off excess hair in the back.
Don’t worry about making it
too long at this point.
We will be trimming it and
shaping it like real hair.
 Hold scissors at an angle to the
head and begin to trim from
front to back. Don’t worry
if the hair is sticking up here and there
We will be spraying and styling more
in the next step.
Be sure to trim front to back
from temple to temple.
 Dip a cotton swab
in hair spray and gently
smooth the hair all around.
Concentrate on blending
the style all around
so it will look natural.
Don’t press hard or you
will lose curl.
 Use a toothpick to push
hairline around a bit
if necessary. It is also
helpful in moving tiny,
stray hairs away from face.
You can also gently lift
hair to give the desired
effect.
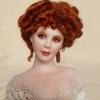
 As you can see, Roland’s
hair has a nice
realistic look to it.
Don’t be afraid to play
around with the hair.
Once you are
happy with the results,
leave to dry.
Roland is pictured above without his mustache. He looks great this way. If You want to add a moustache here are some simple directions:
 Cut viscose into very tiny, short fibers. Use a toothpick to add a thin line of glue to each side of upper lip.
Use a toothpick to gently add bits of the fibers to the glue. Build this up gradually.
Do not add too much “hair” on the upper lip. Experiment with the style of mustache. The important thing is
to keep the hair thin and not bushy. You can even try adding some tiny hairs to the eyebrows.
Thanks again for joining me! I hope this was fun for you!
If you have any questions, please just e-mail me.
© Gina C. Bellous 2001 – 2012 – All Rights Reserved
This tutorial is for your personal use only.
NO portion of this tutorial may be
reprinted without permission,
copied for sale, or to be taught as your own.
Thank you for your cooperation
Enjoy!