China Painting Page 3
Congratulations on your first firing! Dannie is beginning to come to life!
Let’s Move On!
By now you may have noticed that the colors are so much softer. That is a good thing! They should not be washed out!
The color should have a nice satin sheen, but not be glossy.
That could be a sign of over fire
It should also not be chalky looking.
That could be a sign of under firing, or too much matting agent if you put it in a gloss paint to dull it.
NOTE:
I remember seeing these antique “Flirty Eye” type dolls with eyes that moved from side to side with
just with a slight tilting motion. I was hooked on those dolls immediately
and wondered how to translate that to miniature dolls. China Paint has been the answer for me.
HINT: Before we move on to the next step, I feel it is important to talk about the irises
of the eyes. While traditionally most dolls will have eyes with irises looking
straight ahead, I personally love to make my eyes “side glancing” eyes.
In other words. I like it when the eyes on my dolls are looking off to one side or looking up and off
to one side, or looking down, and off to one side. This will help to convey feeling, emotion,
and give a wonderfully, realistic life to you dolls.
It does take a lot of practice getting the eye painting technique down before attempting
side glancing eyes, but they are something to strive to.
For purposes of ease, we will concentrate on the normal straight forward eyes.
With that in mind, let’s continue!
 Time for the irises.
I cannot stress how important this part is.
Hint: Be sure your paint is a bit thicker here. We need the color to stay just where we put it.
Load your brush with either blue or brown
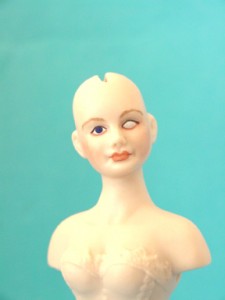
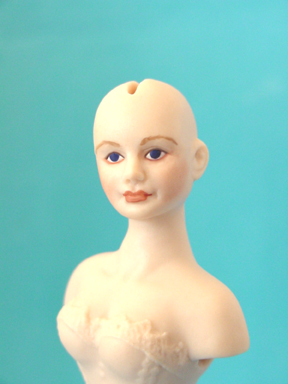
(Dannie has lovely blue eyes). Carefully add a dot of color to the center of the eye. You can gently apply pressure to the brush to help it spread a bit.
Hint: If you mess up! WIPE IT OFF & START AGAIN! Do this until you get it right
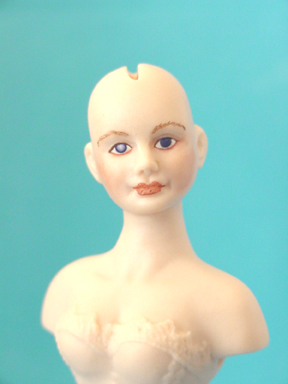
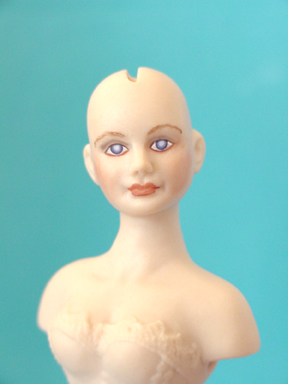
Click on images to get a closer look!
 Repeat this process on the next eye. This is tricky, as it is very difficult to get the exact same size iris.
I don’t need to repeat myself. You know what to do if it doesn’t match, right?
It is imperative that you get a good match & clean lines.
If the eyes seem really wet, let them set for a moment. This will be helpful in the next step. Definitely turn the head upside down to see how closely they match.
 Okay, This is one of my favorite parts, but also one of the MOST frustrating!I will admit, it sometimes sends me over the edge, lol.
Wash your brush in water, blot on paper towel. Dip brush in area medium, and run brush over your skin (yep) to blot excess medium without removing too much from brush.
Carefully set the tip of the brush in the center of the paint. It will blot up
some of the paint. Now repeat this step several times until you can see a nice light circle in the center. Remove enough paint to leave a radiant circle in the iris.
 Ahhh, Dannie, here’s looking at you, kid! Repeat the last step on the opposite eye.
Turn that little head upside down to make sure the irises match.
This is a really important step. The irises should be as even as possible. They should look similar in size, shape, and coloring. It is very easy for one to become lighter or darker than the other one, and that will show up when you go to add the pupils. It will be very noticible.
If it doesn’t look right……yep, wipe it off and start over.
This is the most painful part of china painting, but well worth the effort.
One thing I have always stressed to students:
IF IT DOESN’T LOOK RIGHT NOW, FIRING WILL ONLY MAKE IT WORSE!
Time To Fire Again!
Okay, I admit it. I could be brave and start adding shading,
lip lines, eyebrow lines, etc., but why chance it!
You have slaved over making those little irises perfect!
Why take a chance on smudging one when a quick pop in the
kiln will set the paint? Trust me here, I am speaking
from experience, very bad experience.
Fire to cone 018 according to kiln mfg instructions
Hey! Meet me on the next page! This is fun!
Back Next Page
© Gina C. Bellous 2001 – 2015 – All Rights Reserved
This tutorial is for your personal use only.
NO portion of this tutorial may be
reprinted without permission,
copied for sale, or to be taught as your own.
Thank you for your cooperation
Enjoy!
