Miniature Doll Assembly Instructions
Here is a quick and easy method for assembling 1/12th scale miniature dolls. It will also work with larger dolls. This method will give you a nice, clean looking body with flexibility to enable posing the doll for a natural, realistic look. I have been using this method for my entire doll career and really prefer this to a cloth body.

1. Twist together 2 pipe cleaners, and bend in half.
2. Insert bent pipe cleaner into torso. Cut shorter pieces of double twisted pipe cleaner and put them into the
arm openings. Fill body cavity with hot glue.
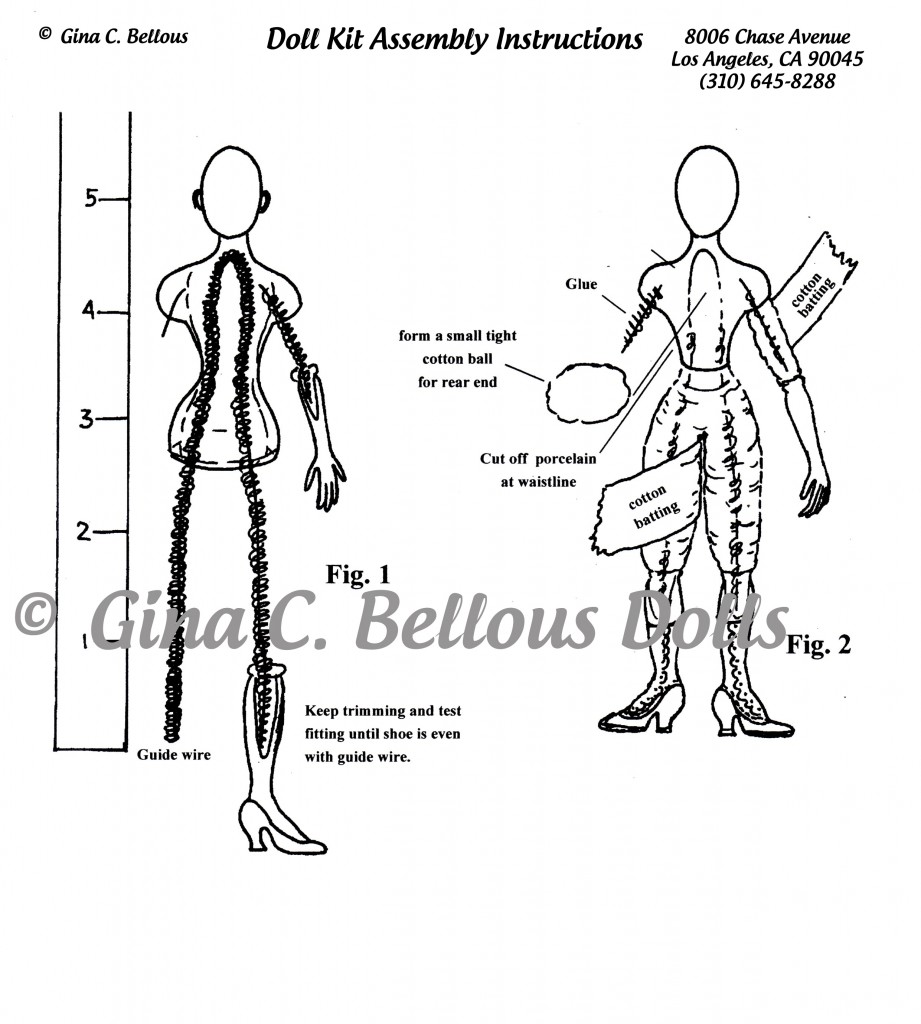
3. Lay doll on a table with a ruler next to it. (Fig. 1)
4. Measure dolls at 5 1/2″ for women, (add at least 1/2″ more if the doll will be sitting). This will allow for
loss of length when bending (posing) the doll.
5. Cut off wire at the height you actually want the doll to be when finished. Use one of these legs as a
“guide wire”.
6. Test fit one of the porcelain legs. Using the other as a guide, cut a little at a time until the porcelain leg
is the same length as the guide wire. Use Zap-A-Gap Glue and the accelerator to set the leg.
7. Repeat with the other side, using the leg you just glued as the new guide.
8. Measure the dolls arms in the same manner as the legs by establishing a “guide wire”. I always make my doll’s arms longer than usual to compensate for the loss of length that occurs when posing. You can always make the arms shorter, but it is really hard to lengthen arms that are too short.
9. Carefully unroll (most pure cotton balls are rolled) into a long thin “batting” strip
10. Apply glue to a pipe cleaner on whole length of one arm.
11. Press one end of cotton “batting” into the glue. Start to wrap, keeping the batting flat. Wrap it onto the arms tightly and smoothly. Don’t cut the cotton, just gently pull so you are not left with a bulky edge. Continue
wrapping to secure the ends (Fig.2)
12. Mix tacky glue with some water to thin it. Dip your finger(s) in this mixture and rub it on the cotton in the same direction you used to wrap the batting. Use the wet washcloth to wipe your fingers on and keep them clean.
13. Adding the glue is very important. It acts as a sealer. When dry, it will be very durable and poseable.
I prefer this method to a cloth body, as it cuts down on the bulk, and when properly done, it gives a neat
finished appearance.
14. Don’t add too much padding on the arms. it is better to have them a bit thinner
15. Pad the legs in the same manner.
16. Start at the knee and work you way up. Keep the batting very flat. Continue wrapping until you meet the top
of the thigh, or you run out of batting. The object is to build up the thigh, but to keep the knee area tapered.
17. Make a small oval pad from cotton scraps. Cover it all with glue, and put it on the back of the doll for her
“rear”. Take some more batting, wrap around the tummy, over the rear, and taper towards the waistline.
(You can also use 2 small craft “pom-poms” instead of the cotton oval pad).
18. Seal the legs and hip section with the watered down glue mixture too.
19. Arms & Legs should look like a “plaster” cast, & be fairly smooth with no big lumps of fuzzies. Let Dry!
© Gina C. Bellous 2001 – 2015 – All Rights Reserved
This tutorial is for your personal use only.
NO portion of this tutorial may be
reprinted without permission,
copied for sale, or to be taught as your own.
Thank you for your cooperation
Enjoy!
